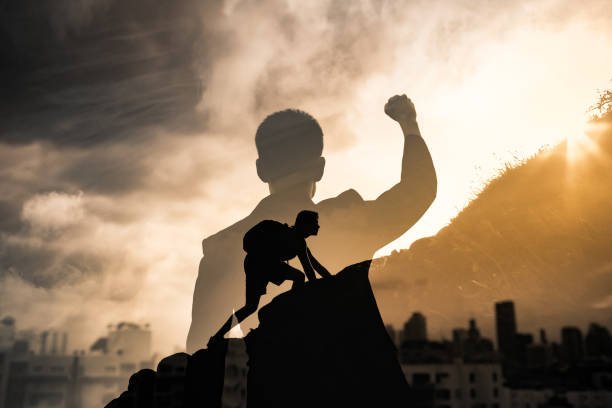
Ever dream of hitting that “Go Live” button and connecting with an audience, only to be stopped by the thought of expensive gear? You see popular streamers with their fancy cameras, glowing backgrounds, and crisp audio, and you think, “I could never afford that.”
Well, I’m here to tell you that you absolutely can.
Building a high-quality, budget-friendly streaming studio isn’t about having the deepest pockets. It’s about being smart, knowing where to invest, and understanding what truly matters to your viewers. Forget the thousand-dollar setups for now. We’re going to break down how to create a professional-looking stream that will captivate your audience without emptying your bank account.
Ready to turn that spare corner of your room into a content creation powerhouse? Let’s dive in.
Table of Contents
Step 1: Master Your Lighting (Because It’s More Important Than Your Camera)
This might sound backward, but it’s the golden rule of video: great lighting with a decent camera will always look better than a bad lighting setup with a fantastic camera. Your audience needs to see you clearly. Murky, shadowy video is an instant turn-off.
The Pro Secret: The Three-Point Lighting System
Professionals use a technique called three-point lighting. It sounds complicated, but the concept is simple:
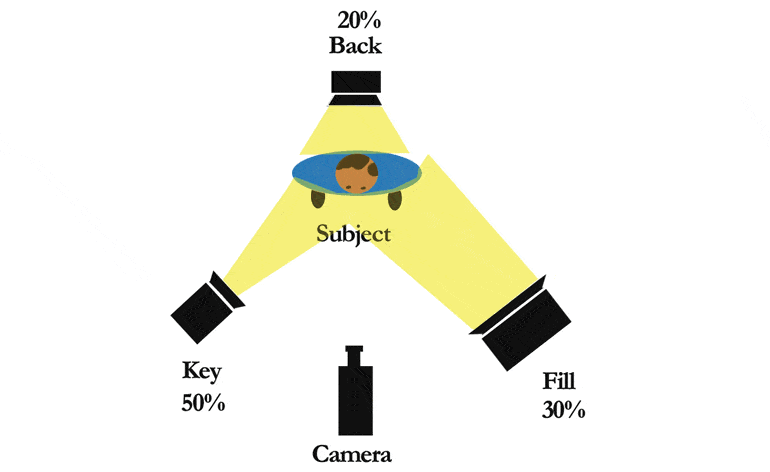
- Key Light: This is your main, brightest light. It shines directly on your face, usually from a 45-degree angle to one side.
- Fill Light: This is a softer light placed on the opposite side of the key light. Its job is to “fill in” the shadows created by the key light, reducing harsh contrast.
- Back Light (or Hair Light): This light is placed behind you, often slightly above your head. It separates you from your background, creating a sense of depth and preventing you from looking like a flat cardboard cutout.
Your Budget-Friendly Lighting Arsenal:
You don’t need to buy expensive studio lights to achieve this. Get creative!
- The Power of a Window: The best light source is completely free: the sun. If you can, set up your desk facing a window. Natural, diffused daylight is incredibly flattering. The only downside is that it’s inconsistent and disappears at night.
- Inexpensive Ring Lights: For under $30, you can get a decent ring light that clips onto your monitor or comes with a small tripod. A ring light acts as both a key and fill light, casting an even, soft glow on your face and creating that cool circular catchlight in your eyes. It’s the single best lighting investment for a new streamer.
- DIY Softboxes: A softbox diffuses light, making it softer and more pleasant. You can buy cheap softbox kits online for around $50-$70, which often include two stands and bulbs. Or, you can make your own! Clamp a simple work light or a bright desk lamp and shine it through a white sheet, parchment paper, or a thin white t-shirt. (Safety first! Keep flammable materials away from hot bulbs).
- Everyday Lamps: Look around your house. Do you have a couple of desk lamps? Use them! Position one as your key light and another, perhaps with a less intense bulb or placed further away, as your fill light. For a backlight, a simple, cheap floor lamp placed behind you works wonders.
The goal is to eliminate shadows on your face and separate yourself from the background. Start with a ring light, and you’ll immediately see a massive improvement.
Step 2: Crystal Clear Audio (Your Voice is Your Brand)
If your lighting is rule number one, crystal clear audio is rule 1A. Viewers might forgive grainy video, but they will click away in seconds if they can’t hear you properly or if your audio is full of static, echo, and background noise.
Your laptop or webcam microphone is simply not good enough. It’s designed to pick up sound from all directions, which means it will capture your voice, your keyboard clicks, your computer fan, and your neighbor’s dog barking.
Your Budget-Friendly Audio Solution: The USB Microphone
This is the sweet spot for budget streaming. USB microphones are plug-and-play, affordable, and offer a gigantic leap in quality over any built-in mic.
Top Budget Picks:
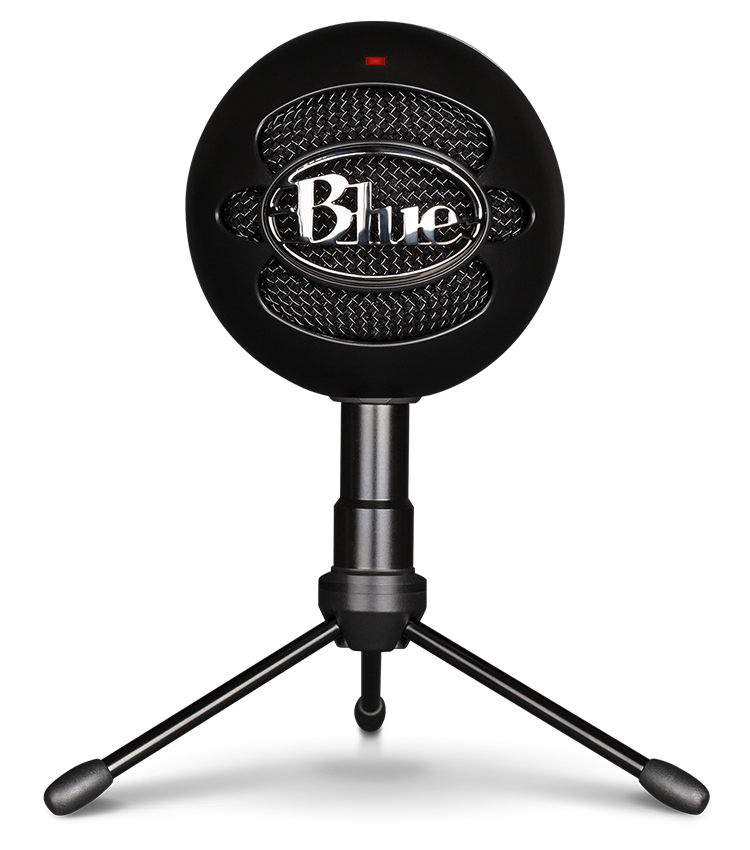
- Blue Snowball iCE: Often considered the king of entry-level USB mics. For around $40-$50, it delivers clear, rich audio that’s perfect for streaming, podcasting, and voiceovers.
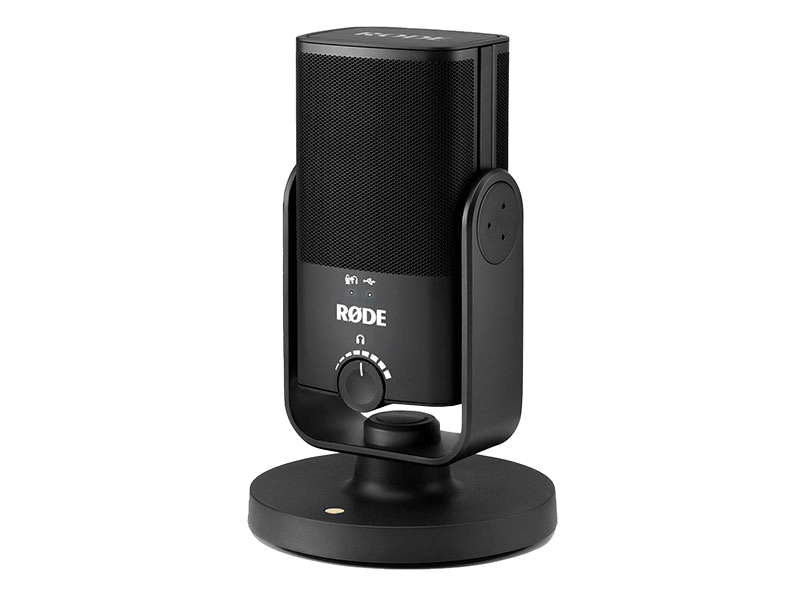
- Rode NT-USB Mini: A fantastic, compact option that offers studio-quality sound in a simple package. It’s a bit more of an investment (around $99) but worth every penny if you can stretch your budget.
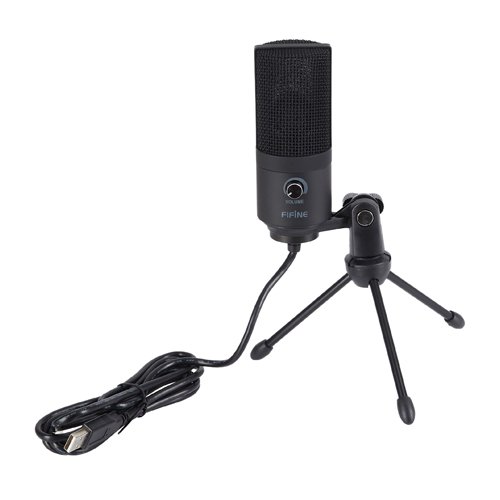
- Fifine K669B: A hidden gem in the budget world. You can often find this mic for under $35, and its performance rivals microphones that cost twice as much. It’s a no-brainer for anyone starting a budget-friendly streaming studio.
Pro-Tips for Better Audio:
- Get Close: The ideal distance between your mouth and your microphone is about 6-8 inches (a “shaka” sign distance). This ensures the mic picks up your voice clearly without capturing too much room noise.
- Use a Pop Filter: That little foam or mesh screen you see in front of microphones isn’t just for show. It prevents “plosives”—the harsh popping sounds made by “p” and “b” sounds hitting the mic. Many budget mics come with one, or you can buy one for less than $10.
- Mic Arm or Stand: Getting your mic off your desk and onto an arm or stand is a game-changer. It reduces vibrations from typing and mouse movements and allows you to position the mic perfectly. You can find surprisingly sturdy boom arms for around $20.
Step 3: Choose Your Camera Wisely (HD is the Standard)
With your lighting and audio sorted, it’s time for the camera. While your smartphone camera is surprisingly powerful, a dedicated webcam offers convenience and easy integration with streaming software.
The magic number you’re looking for is 1080p. While 4K is nice, most streaming platforms like Twitch and YouTube Gaming default to 1080p for live content anyway. A solid 1080p webcam will make you look sharp and professional.
Your Budget-Friendly Camera Options:
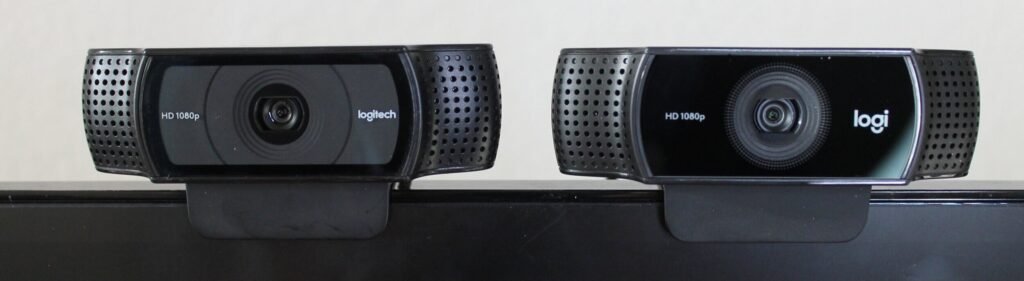
- Logitech C920 / C922: This is the undisputed champion of webcams for a reason. It has been the gold standard for streamers for years. It provides a crisp 1080p image, has decent autofocus, and performs well in low-light (especially when paired with your new lighting setup!). You can often find the C920 for around $60-$70. The C922 is a slight upgrade with a higher frame rate option (720p at 60fps), which is great for gaming.
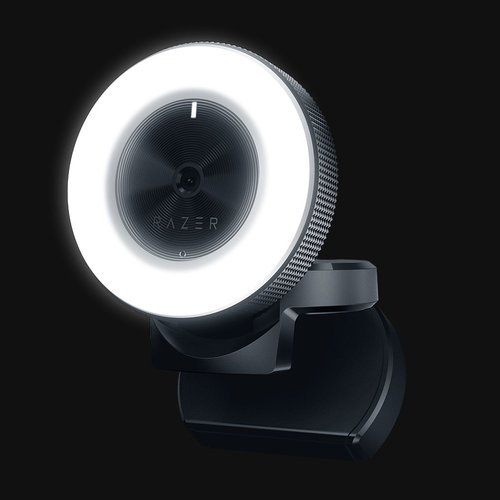
- Razer Kiyo: What makes the Kiyo unique is its built-in ring light. If you’re extremely tight on space and budget, this can be a great all-in-one solution for both camera and basic lighting. The image quality is excellent and comparable to the Logitech series.
- Use Your Smartphone: Don’t sleep on the camera in your pocket! Modern smartphone cameras are phenomenal. Using an app like EpocCam or DroidCam, you can turn your phone into a high-quality wireless webcam for your computer. All you need is a small tripod or phone mount to hold it steady. This is a fantastic $0 option if you already own a good phone.
Step 4: Create an Engaging Background (No Messy Bedrooms!)
Your background is part of your brand. It tells a story about who you are. A cluttered, distracting background can pull focus away from you. You have two main paths here: a physical background or a virtual one using a green screen.
The Physical Background Route:
This is often the easiest and most authentic way to go. You don’t need a custom-built set.
- Clean and Curate: The cheapest and most effective trick? Tidy up! A clean, organized bookshelf, a wall with a few cool posters, or even a neatly made bed can look great on camera.
- Add Personality with Lighting: This is where you can get creative. Use cheap RGB LED light strips (around $15-$25) to cast a colored glow on the wall behind you. Place a cool-looking lamp, like a lava lamp or a salt lamp, on a shelf in the background. This adds depth and visual interest for very little money.
- Fabric Backdrop: Don’t have a nice wall to show off? No problem. Buy a large piece of fabric in a neutral color like gray or navy blue and hang it behind you. You can even find collapsible backdrops for around $40-$60 that are easy to set up and store.
The Green Screen Route:
A green screen allows you to digitally replace your background with any image or video you want. This offers ultimate flexibility but requires a little more setup.
- Budget Green Screens: You don’t need a Hollywood-grade screen. A large piece of bright green fabric or even a wall painted with special green screen paint will work. You can find collapsible green screens that attach to your chair for around $30.
- The Key is EVEN Lighting: The trick to a good green screen effect (called “chroma keying”) is to light the screen itself as evenly as possible. If there are shadows or bright spots on the screen, your software will have a hard time keying it out, resulting in a glitchy, unprofessional look. This might require one or two extra cheap lamps pointed at the screen.
Step 5: The Brains of the Operation: Streaming Software
All this great gear needs software to bring it together and send it out to the world. Luckily, the best and most popular options are completely free.

- OBS Studio (Open Broadcaster Software): This is the undisputed king of streaming software. It’s free, open-source, and incredibly powerful. It allows you to create different “scenes” (like a “Starting Soon” screen, a “Live Gameplay” screen, and an “Intermission” screen) and switch between them seamlessly. There is a learning curve, but the massive community means there are thousands of free tutorials on YouTube to help you master it.

- Streamlabs Desktop: Built on top of OBS, Streamlabs offers a more user-friendly, streamlined experience. It has many built-in features that are attractive to new streamers, like integrated alert boxes (for new followers/subscribers), chat management, and free overlay themes. It’s a fantastic starting point if OBS feels too intimidating.
Both are excellent choices. Download both and see which interface you prefer.
Step 6: Putting It All Together: The Setup
Now, let’s assemble your budget-friendly streaming studio.
- Position Your Desk: If possible, face a window for natural light. If not, pick a corner with a non-distracting wall behind it.
- Set Up Your Lights: Place your key light (e.g., ring light) in front of you. If you have a second light, use it as a fill. Place a third lamp behind you for that backlight pop.
- Mount Your Camera: Place your webcam on top of your monitor or your phone on a tripod at eye level. Looking slightly down at a camera is unflattering; eye-level is best.
- Position Your Mic: Use a boom arm to position your USB microphone about 6-8 inches from your mouth and slightly to the side, so it’s not blocking your face. Don’t forget the pop filter.
- Configure Your Software: Open OBS or Streamlabs. Add your camera, microphone, and any other sources (like game capture or your display). Do a test recording to check your levels. Is your audio clear? Is your lighting even? Is your face in focus?
Step 7: The Final Polish: Free Overlays and Alerts
A professional-looking stream has polished graphics. Overlays (the frames around your webcam and gameplay) and alerts (the pop-ups for new followers or donations) add a layer of production value that makes you look like a pro.
You don’t need to be a graphic designer. Websites like Streamlabs, Nerd or Die, and OWN3D offer tons of free, professional-looking overlay packages that you can install with a few clicks. Find one that matches your vibe and brand, and you’re ready to go.
Frequently Asked Questions (FAQ)
Got a few more questions? You’re not alone! Here are some of the most common things new streamers ask.
What is the absolute first thing I should buy if I can only afford one item? Your audio. Hands down. Get a quality budget USB microphone like the Fifine K669B or Blue Snowball iCE. Viewers will forgive a slightly fuzzy camera, but they will not tolerate scratchy, hard-to-understand audio. Your voice is your primary connection to them, so make it a priority.
Do I really need a green screen to look professional? Absolutely not! In fact, a poorly lit green screen looks much worse than a clean, authentic physical background. Start by tidying the space behind you. Add some personality with a bookshelf, a poster, or some cheap RGB light strips for a splash of color. A natural background often feels more genuine and welcoming to viewers.
How do I know if my internet is fast enough to stream? This is crucial. You need to look at your upload speed, not your download speed. Go to a site like Speedtest by Ookla and run a test. For a smooth stream at 1080p, you should have a minimum sustained upload speed of 6 Mbps. More is always better, as it gives you a buffer and ensures stability.
My stream is laggy or dropping frames. How do I fix it? This is the classic streamer’s dilemma! It’s usually caused by either your internet connection or your PC not being powerful enough. First, confirm your upload speed is stable. If it is, the problem is likely your PC. In OBS or Streamlabs, you can check for “Dropped Frames” in the stats window. To fix it, try lowering your stream’s output resolution from 1080p to 720p, or lower your in-game graphics settings. This frees up resources for your computer to handle the encoding process smoothly.
Can I use this advice to stream from my PlayStation or Xbox? Yes! Lighting and audio are universal. While you can stream directly from your console, you’ll be limited to its built-in software. To get the pro look with overlays and a great mic, you’ll need a capture card. This device connects your console to your PC, allowing your computer to handle the stream through OBS while you play on your console. Budget-friendly options exist from brands like AVerMedia, NZXT, or you can find a used Elgato HD60 S.
I have the budget setup. What’s the very next thing I should upgrade? Once you have your basic mic, camera, and a light, the best bang-for-your-buck upgrade is almost always more lighting. Go from a single ring light to a full three-point lighting setup. Adding a dedicated fill light and a backlight will make a far bigger difference to your visual quality than upgrading your 1080p webcam to a slightly better 1080p webcam.
Your Streaming Journey Starts Now
See? Building a budget-friendly streaming studio that looks and sounds incredible is 100% achievable. You don’t need to go into debt to chase your passion. By focusing on the essentials—lighting, audio, and a decent HD camera—you can create a setup that rivals streamers with gear costing ten times as much.
We’ve covered the seven key steps:
- Master Lighting with natural light or cheap lamps.
- Capture Clear Audio with an affordable USB mic.
- Choose a Solid 1080p Camera like a webcam or your phone.
- Create an Engaging Background that’s clean or uses a simple green screen.
- Use Free, Powerful Software like OBS Studio or Streamlabs.
- Assemble Everything for optimal placement and performance.
- Add Professional Polish with free overlays and alerts.
The most important step? Just get started. Your first stream won’t be perfect, and that’s okay. Your setup will evolve as you grow. The key is to hit that “Go Live” button and start building your community.
Now it’s your turn! What’s the one budget tip you’ve found most helpful? Do you have a favorite piece of budget gear we didn’t mention? Share your thoughts and questions in the comments below! Let’s help each other build our dream studios. Also don’t forget to subscribe to MindGearMen.