Let’s be honest. We’ve all seen it, and maybe we’ve even done it. That shaky, awkwardly framed overhead shot, filmed by hand while trying to perform another task. Or perhaps the more daring version: the expensive camera precariously balanced on a wobbly stack of books, threatening to crash down at any moment.
You have a fantastic idea for a YouTube video. You can picture it perfectly—the satisfying spread of ingredients for a cooking tutorial, the intricate brush strokes of a watercolor painting, or the detailed layout of a new gadget in an unboxing video. The key to making it pop, to drawing your audience in, is that clean, professional bird’s-eye view. It’s the shot that says, “I know what I’m doing.”
But the gap between that vision and the reality of your footage can be frustrating. You’re fighting against weird shadows, unstable shots, and the constant, nagging fear of gravity winning the war against your expensive gear. It’s enough to make anyone give up on the idea altogether.
But what if the solution wasn’t more effort, but better gear? The secret behind the crisp, stable overhead shots you see from top creators isn’t some unobtainable Hollywood magic. It’s a single, game-changing piece of equipment: a dedicated camera arm or mount. Today, we’re going to demystify these tools and show you the 5 best options that will permanently elevate your content.
Why a Dedicated Mount is a Non-Negotiable Investment
Before we get into specific products, let’s cement the why. Why can’t you just make do with that old tripod you have lying around? Pushing a standard tripod into a role it wasn’t designed for is a recipe for disaster.
First and foremost is the physics of stability. A tripod is engineered to support weight directly above its center column, creating a stable center of gravity. The moment you hang a $2,000 camera and lens combo off to the side, you shift that center of gravity dangerously. The entire rig becomes a ticking time bomb, waiting for the slightest nudge to tip over and smash your investment. Dedicated overhead mounts are built with counter-leverage, wider bases, or direct clamping force to safely manage these off-center loads.
Next is creative freedom and workflow. Imagine trying to demonstrate a complex recipe while also using one hand to hold your camera. It’s impossible. A proper overhead rig frees up your most important tools: your hands. It holds the camera exactly where you want it, for as long as you want it, allowing you to focus completely on your craft. You can make adjustments to your subject without ever touching—and potentially bumping—your camera.
Finally, there’s the issue of safety and professionalism. Securing your camera with a dedicated mount isn’t just about protecting your gear; it’s about respecting your work. It shows you take your content creation seriously. The stability it provides translates directly into higher-quality footage, free from the micro-jitters and wobbles that scream “amateur” to a discerning audience. It’s the foundational step to achieving that polished look you’re aiming for.
The Elite 5: The Best Camera Arms & Mounts for Overhead Filming
Ready to find the perfect match for your creative space? We’ve handpicked the top 5 solutions, each excelling in a specific scenario, complete with real product examples to guide your search.
1. The Desk-Based Powerhouse: Modular Arm Systems
For the modern content creator whose studio is also their desk, modular arm systems are an absolute revolution. Instead of a single, fixed arm, these are entire ecosystems of parts—clamps, poles, and arms—that you can piece together to build a custom rig perfectly suited to your space.
The undisputed champion in this category is the Elgato Multi Mount System. Originally designed for streamers, its versatility has made it a favorite among all types of desk-based creators. The system starts with a sturdy, padded desk clamp that acts as the base. From there, you add rigid steel poles to achieve your desired height. The magic happens with the attachments: you can add a Flex Arm for ultimate maneuverability with lighter cameras (like a Sony ZV-1 or a smartphone) or a Solid Arm for a more robust, fixed position.
- Who it’s for: YouTubers, Twitch streamers, educators, podcasters, and anyone who primarily films tutorials, unboxings, or gameplay at a desk.
- Easy to Get Products:
- Base: Elgato Multi Mount (includes base clamp and main pole)
- Extensions: Elgato Solid Arm, Elgato Flex Arm Kit
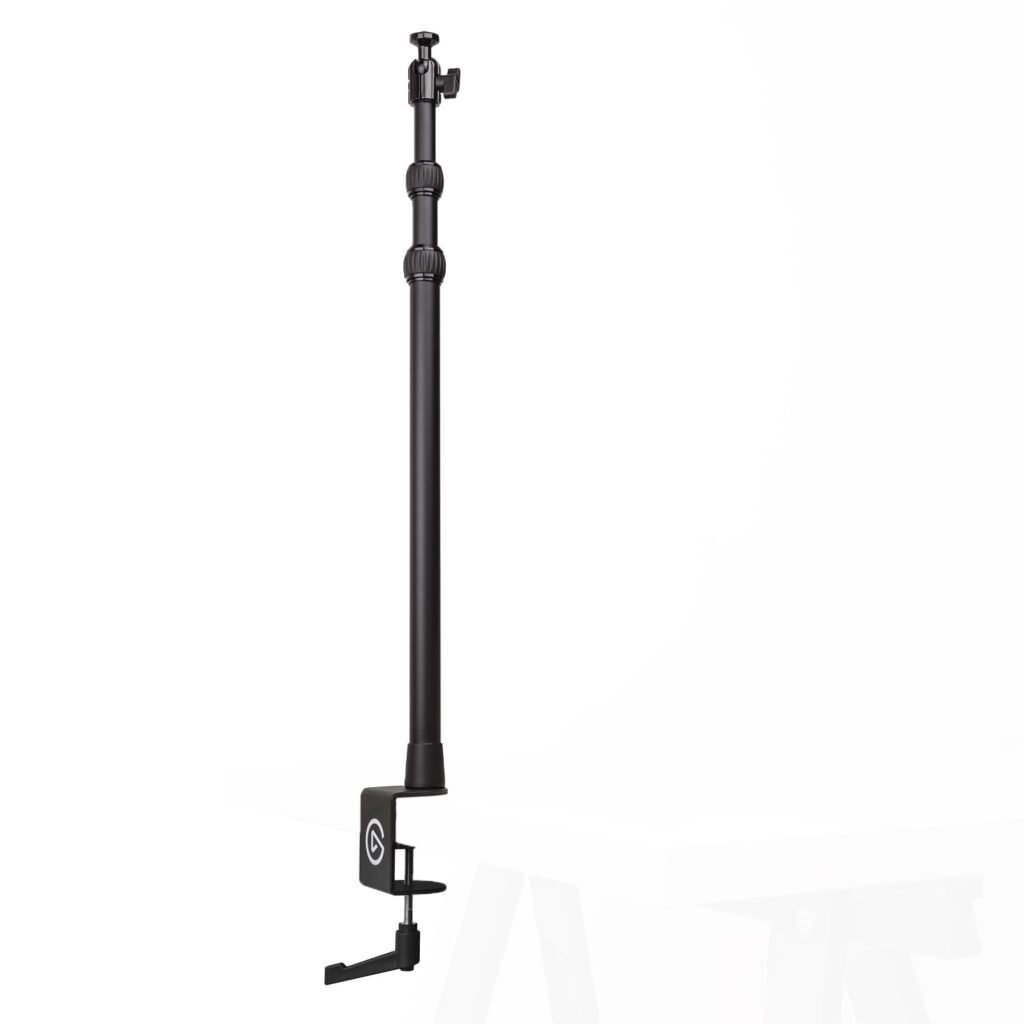
- Pros: Highly customizable and expandable. Creates an incredibly clean setup with a minimal footprint on your desk. Keeps your floor completely clear of stands. The build quality is excellent for the price.
- Cons: You are tethered to your desk. The Flex Arm has a fairly low payload capacity (around 1.1 lbs / 500g), so it’s not suitable for heavier DSLR or mirrorless setups with large lenses. You’ll need the Solid Arm for that.
2. The Precision Tool: Articulating “Magic” Arms
If you need to position a camera in a very specific, often awkward, spot, the articulating “magic” arm is your best friend. These arms feature elbow-like joints that can be adjusted on multiple axes. Their defining feature is a single locking knob; when you loosen it, all joints move freely, and when you tighten it, everything locks into a rock-solid position.
For a complete, ultra-versatile overhead kit, you pair a high-quality magic arm with an equally robust clamp. The Manfrotto 244 Variable Friction Micro Arm is a gold standard. Its “variable friction” technology allows you to make minute adjustments without the arm completely collapsing, a feature cheaper arms lack. Pair this with a Manfrotto 035 Super Clamp, which can securely bite onto almost any surface—a bookshelf, a pole, a table edge—and you have a rig you can set up almost anywhere.
- Who it’s for: Product photographers, food bloggers needing tight shots, crafters filming detailed work, and anyone who needs a portable, highly adaptable solution.
- Easy to Get Products:
- Arm: Manfrotto 244 Variable Friction Micro Arm, SmallRig 2070 Magic Arm
- Clamp: Manfrotto 035 Super Clamp, SmallRig 2220 Super Clamp
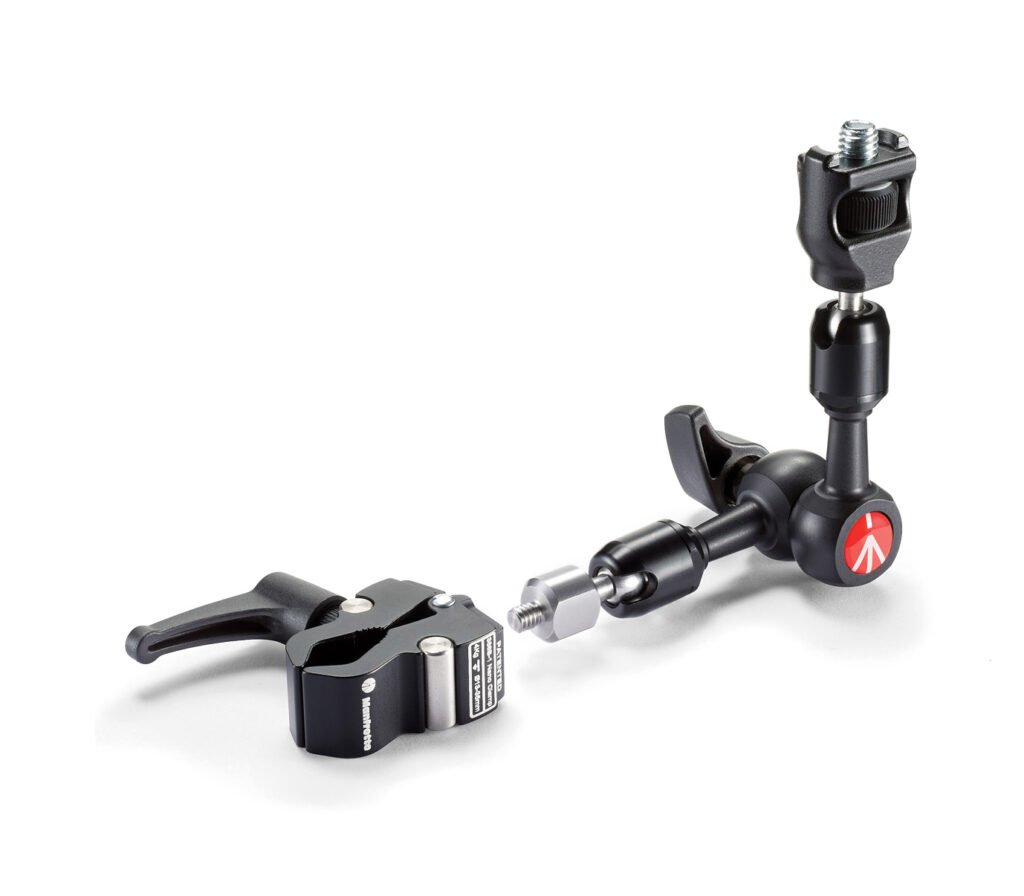
- Pros: Unmatched flexibility for precise positioning. The clamp system allows for creative mounting in places traditional stands can’t go. Relatively compact and easy to transport.
- Cons: Stability is entirely dependent on what you clamp it to. They have a limited reach and payload capacity, best suited for mirrorless cameras, action cams, or smartphones rather than heavy cinematic rigs.
3. The All-in-One Workhorse: Tripods with a 90-Degree Column
What if you need the flexibility of an overhead boom but aren’t always filming at a desk? A specialized tripod with a 90-degree pivoting center column is an incredibly powerful and self-contained solution. With these tripods, you can use them in the traditional vertical orientation, or you can unlock the column, slide it up, and pivot it horizontally to act as an overhead boom arm.
This design gives you the freedom to set up your top-down shot anywhere in a room—over a kitchen island, a low coffee table, or even for filming a subject on the floor. The Manfrotto MT055XPRO3 is a legendary example, known for its robust build and secure locking mechanism. Another excellent choice is the Vanguard Alta Pro 263AT, which is often praised for its ease of use and stability.
- Who it’s for: Food videographers, artists working on large easels or canvases, stop-motion animators, and creators who need a versatile solution that works as both a standard and an overhead tripod.
- Easy to Get Products:
- Tripod: Manfrotto MT055XPRO3, Vanguard Alta Pro 263AT, 3 Legged Thing Punks Travis 2.0
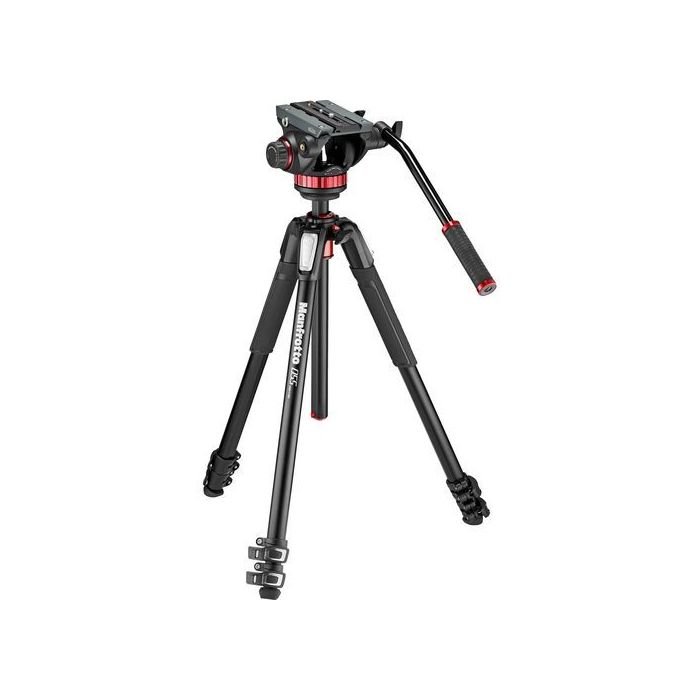
- Pros: Fully location-independent; no desk or shelf required. Highly stable for heavier camera setups when properly counterbalanced. Serves a dual purpose as a high-quality standard tripod.
- Cons: Requires a significant floor footprint. Using a counterweight is not optional, it’s essential for safety. You must hang your camera bag or a dedicated sandbag from the hook on the opposite end of the arm to prevent a very expensive tipping accident.
4. The Unshakeable Studio Standard: The C-Stand
When you see behind-the-scenes footage from a professional film set or photo shoot, you will see C-Stands (Century Stands) everywhere. These are the undisputed heavyweights of camera and lighting support. A C-Stand kit is your answer when you need to support a heavy, fully rigged cinema camera for an overhead shot without a single worry.
A typical C-Stand kit, like a popular and affordable one from Neewer or a more robust one from Impact or Avenger, includes three main parts: the heavy “turtle base” designed for maximum stability, the main riser column, and a grip head/boom arm combo. The grip head is a marvel of engineering, allowing you to clamp the boom arm at any angle with incredible force. This setup will confidently hold a rigged-out Blackmagic Pocket Cinema Camera, a Canon C70, or a DSLR with a heavy lens, a monitor, and a microphone.
- Who it’s for: Independent filmmakers, commercial videographers, and dedicated creators with a studio space who need to support heavy gear with zero compromises on safety or stability.
- Easy to Get Products:
- Stand Kit: Neewer Pro 100% Stainless Steel C-Stand, Impact Turtle Base C-Stand Kit, Avenger A2033LKIT C-Stand Kit.

- Pros: The gold standard for stability and payload capacity. Incredibly durable and will last a lifetime. Trusted by industry professionals worldwide.
- Cons: Heavy, bulky, and can be cumbersome to move and set up. They are more expensive and represent a serious investment in your studio infrastructure.
5. The Permanent Solution: Wall & Ceiling Mounts
For the creator who has found their perfect shot in a dedicated space, a permanent mount is the ultimate “set it and forget it” solution. By mounting an arm directly to a wall stud or ceiling joist, you create an incredibly stable overhead rig that takes up zero floor or desk space. It’s always there, perfectly positioned and ready to film at a moment’s notice.
This is ideal for a dedicated kitchen set, a crafting station, or a workshop bench that is always filmed from the same overhead perspective. Products like the Manfrotto 155BKL Wall Mounted Boom Arm provide extensive reach and support, while simpler ceiling mounts designed for projectors can be adapted with the right hardware to hold a camera securely.
- Who it’s for: Creators with a permanent, dedicated studio space who need a consistent, repeatable overhead shot without the daily hassle of setting up a stand.
- Easy to Get Products:
- Wall Boom: Manfrotto 155BKL Wall Mounted Camera Boom
- Ceiling Mounts: Check offerings from brands like Peerless-AV or B-Tech AV Mounts (often require additional adapters for camera mounting).
- Pros: The cleanest possible setup with no footprint. Extreme stability due to being anchored to the building’s structure. Perfect for shot consistency.
- Cons: Requires permanent installation, including drilling into your walls or ceiling. You absolutely must locate and anchor into a solid wood stud or joist. Drywall anchors will fail. If you are not 100% confident, hire a professional for installation.
Your Buying Checklist: 4 Things to Check Before You Buy
Feeling inspired? Great! Before you click that “Add to Cart” button, run through this final checklist to ensure you’re making the right choice for your gear and your content.
- Payload Capacity: This is your number one priority. Calculate the total weight of your setup: camera body + heaviest lens + microphone + monitor + any other accessory. Now, find a mount with a maximum payload capacity that is at least 50% higher than your total weight. This safety buffer is non-negotiable.
- Maximum Reach: Measure your space. How far from the mounting point (the desk edge, the tripod column, the wall) does the camera need to be to frame your subject perfectly? Choose a model that gives you a few extra inches of reach than you think you need. It’s better to have it and not need it than to need it and not have it.
- Mounting Compatibility: Check the hardware. Does the arm end in a standard 1/4″-20 or 3/8″-16 screw that your camera or ball head can attach to? How does the base attach? Make sure the clamp is wide enough for your desk or that the stand connections are compatible.
- Build Quality & Locking Mechanisms: This is where price differences often show. Look for all-metal construction, especially for load-bearing joints. Read user reviews and watch video reviews. Do people complain about the locks slipping or the arm drooping over time? Investing a little more in a product from a reputable brand like Manfrotto, Elgato, or SmallRig often pays for itself in reliability and peace of mind.
Frequently Asked Questions About Overhead Filming Rigs
You’ve got the concepts down, but a few practical questions might still be rolling around in your head. Let’s tackle some of the most common ones we hear from creators gearing up for their first top-down shots.
Q: What’s the best and cheapest way to film overhead with just my smartphone?
A: This is a great question, as so much incredible content is made on phones today! For a simple, affordable, and effective setup, your best bet is a desk-mounted scissor boom arm paired with a high-quality smartphone holder (like the Manfrotto PIXI Clamp or a Ulanzi ST-02S). These microphone-style arms clamp to your desk, have great reach, and can easily handle the low weight of a phone.
Alternatively, a small articulating “magic” arm and a Super Clamp give you more versatility to mount your phone to a shelf or pole. The key is to invest in a decent mount even for a lightweight phone. The ultra-cheap options often suffer from “drift,” where the arm slowly sags under the phone’s weight, ruining your shot halfway through a take.
Q: My camera keeps trying to tip my tripod over when I use the horizontal arm. How do I stop this?
A: This is the most critical safety question for this type of setup! The solution is one non-negotiable word: counterweight. When you extend your camera and lens out on one side of the tripod, you have to put an equal (or greater) weight on the opposite side to balance the load and keep the center of gravity stable.
The professional method is to use a dedicated sandbag, which you can hang from the hook at the end of the boom arm. However, a fantastic and free alternative is to simply hang your camera bag—filled with your extra lenses, batteries, and accessories—from that same hook. Also, for maximum stability, always remember to rotate the boom arm so that it is positioned directly above one of the tripod’s three legs. This creates the most stable base possible.
Q: Can I just use my webcam, like a Logitech or Razer, for overhead shots?
A: Absolutely! Using a webcam for an overhead perspective is an incredibly popular setup for live streamers, educators, and YouTubers demonstrating something on their desk. Because webcams are so lightweight, they can be supported by almost any mount, including the more affordable scissor boom arms or a flexible arm like the Elgato Flex Arm.
The main benefits are simplicity and convenience. You just plug it in via USB, you don’t have to worry about batteries dying, and it’s easily recognized by software like OBS or Zoom. The trade-off might be in image quality, manual control, and depth of field compared to a larger mirrorless or DSLR camera, but for many applications, a high-quality 1080p or 4K webcam is more than enough.
Q: Do I need to buy a separate ball head or fluid head to put on the end of my overhead arm?
A: That’s a great technical question. The short answer is: it’s not always essential, but it is highly recommended for convenience.
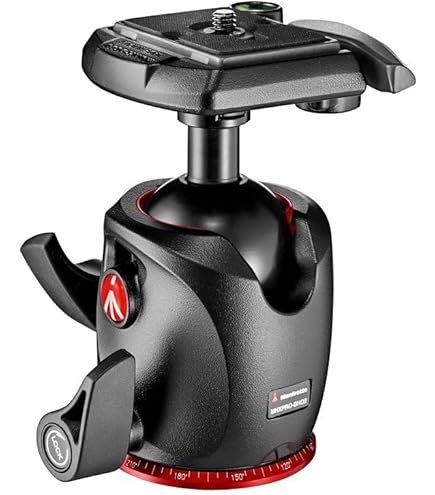
Most overhead arms end with a simple 1/4″-20 screw where you mount your camera. While you can attach your camera directly, it can be tricky to get it perfectly level. Adding a small, lightweight ball head between the arm and your camera makes this incredibly easy. You can loosen the ball head, adjust the camera to that perfect 90-degree downward angle, and lock it in place without having to fiddle with the entire arm. You don’t need an expensive, heavy-duty one for this. A compact ball head is perfect.
A fluid head is designed for smooth panning and tilting. For a static top-down shot, it’s complete overkill. You’d only need one if you specifically plan to introduce smooth camera movements into your overhead shots.
Q: If I can only focus on one feature, what is the absolute most important thing to look for?
A: While things like reach and build quality are very important, the single most critical feature you must get right is Payload Capacity. This number tells you the maximum weight the arm or mount can safely support. Think of it as a safety rating first and a performance feature second.
An arm that is straining near its weight limit will be shaky, prone to drooping, and is at a much higher risk of failing completely, potentially destroying your camera. Know the total weight of your camera setup (body, lens, mic, etc.) and choose a mount with a payload capacity that is significantly higher. This buffer gives you peace of mind, a more stable shot, and the flexibility to add or upgrade accessories in the future without worry.
Your Best Content is Within Reach
That wobbly, poorly-framed shot that’s been holding you back doesn’t have to be your reality anymore. By selecting the right camera arm or mount for overhead filming, you are making a deliberate choice to improve your workflow, protect your gear, and produce higher-quality, more engaging content. You’re moving from “making do” to “making it great.”
Stop fighting your gear and start creating with the confidence that comes from a stable, reliable setup. That beautiful, professional bird’s-eye view is waiting for you.
Ready to find the perfect overhead solution to transform your videos? Explore our handpicked selection of professional-grade camera arms, mounts, and stands at MindGearMen. We have the tools you need to bring your creative vision to life!
What’s your go-to setup for overhead shots? Do you have a favorite product we didn’t mention? Share your tips and questions in the comments below!